This week we have been learning how to fit and construct an 18th century corset. After working on a set design for an 18th century play, I found this skills week to be very useful and rewarding. Having the skills week, a week before our Beggar's Opera project finished, it gave us time to see one to one how the silhouette of the time period was made.
I have really enjoyed this skills week as it allowed me to go back to the sewing machine, something I am comfortable using but also pushed me to learn new things, such as pattern laying, amending the basic pattern to fit me and seeing how the panels and boning channels work together to form shape and support for the wearer.
My corset fitted well and given another day I would have been able to finish it entirely. At the end of the week the only section I had left to do was the bias binding around the neck of the corset. Unfortunately with the number of people and number of machines there wasn't enough time to finish the corset entirely so this I finished off in my own time.
I liked the idea of comedy in a show, I also thought that social class was important in The Beggar's Opera To combine the two on stage I decided to use large (over sized) picture frames, painted in gold and bronze.
The frames are to represent the quality and hierarchy of those with power over those without. I chose to link two of the frames, one gold and one bronze to demonstrate that the social classes will always intertwine and be around each other.
I made the frames from black card because I thought that it would give the best surface to stick clay to.
Themes that are explored the The Beggar's Opera...
Equality: Equality is hinted and mocked at in the Beggar's Opera, it has come up in discussions that the social classes of the time are quite different. A big contrast between the generously rich and the desperately poor.
Marriage: In the world of The Beggar's Opera, marriage doesn't quite have the same kind of meaning as I would have thought it to have. Marriage doesn't hold the romance and loyalty as it probably should have in this play. There's isn't much about the sense of honestly or loyalty in the play and the emotions of the characters seems to be more about themselves than that for others. For example when Polly and Lucy realise that they are playing against each other, Lucy plans ways to get rid of Polly so that she can have the attention of Macheath to herself.
Dishonesty:Macheath marries or commits to several different women, give promises but ultimately know that he doesn't really want them completely. He lies and cheats to get things from them but in the end he is given freedom and chooses one of the women he really loved/lusted, Polly. Another thing that I believe John Gay is trying to say throughout the play is how the people get into high places (jobs and positions in society) not through virtue, but through dishonesty.
Friendship: This is an interesting thing to think about through the play. There seems to be a strong sense of friendship between the main characters. This is however up until the moment that the two families daughters fall and in fact marry the same man. The friendships are connected by crimes, however the friendships are mostly controlled by the characters selfishness and not being considerate to each other's future.
Self Awareness: Throughout the play, each character is constantly blaming others around them for their own faults. Another thing about the characters in the play is that a a few of the characters, specifically Polly and Lucy, they argue about their love and marriage to Macheath, however they soon realise that they have both fallen for the same guy with the same problems. Soon after conversing, they realise that they aren't all that different. I think what might be trying to be passed across to the views/audience is that we need to look closer at ourselves before throwing blame elsewhere.
Law: There doesn't seem to appear to be any sense of an enforced law. The Peachums and Lock's don't take any time at all in thinking twice about killing Macheath. In fact none of the characters in this story seem to care or have and moral sense about anybody, be it friend or family being killed or dying. The lawyers seem to come off as the worst type of people in this society. Repeatedly invoked throughout the play as the prime example of those who profit by the vice of other. Protecting the people in the wrong one day then prosecuting them then next.
What is a Ballad Opera? 'ballad operacharacteristic English type ofcomic opera, originating in the 18th century and featuring farcical or extravaganza plots. The music was mainly confined to songs interspersed in spoken dialogue. Such operas at first used ballads or folk songs to which new words were adapted; later, tunes were borrowed from popular operas, or music was occasionally newly composed.' Quote taken from : http://www.britannica.com/EBchecked/topic/50485/ballad-opera
Over the past week, we have been learning a new skill. We have started to build a basis of knowledge about mask making. One of the types that we have been learning is the process of prosthetic mask making. We started off in small group of five and one member of the group put themselves forward to be the model for the mask. This process involved using latex, placing it onto the model's entire face, making sure that the nostrils were kept clear of the mixture. Somebody in the group was on duty to make sure that the models nostrils weren't covered and that the model felt comfortable and able to breath comfortably.
After the mixture are solidified a bit more, we then used cut up strips of mod rock and started covering the latex. Again making sure that the models nose wasn't covered up and that they still felt comfortable. After adding a couple of layers to the mod rock, we then waited for it to strengthen, before taking the whole mould off of the models face. Once the mould was completely removed, it was really fascinating to see the fine details of the eyelashes and eyebrows that the mould had picked up. Because we didn't cover up the models nose whilst layering up the materials over the mould, there was a hole in the mould. To fix this we added more mod rock to strengthen the nose section. The mod rock creates a hard external layer which is necessary apply because once we add the plaster the mould can loose it's shape, distorting the face, which means that it wouldn't fit properly back onto the model once finished.
The mould of Jenny's face then gave us the basis to create the character that we designed. An old haggered witch. From here we then covered the mould of Jenny's face with clay to create the features of the witch. This process was shared between us all and we all had separate sections that we added to the process. Starting with the basis of the witches facial features, then bulking out the shape and defining some lines. The last step was to create texture to the face. We did this by using a soft paint brush to create lines across the face and a spatula to add deep wrinkles in the forehead and cheeks. The next step was to take the negative mould of the witches face and insert the original mould of Jenny's face. Creating the colours of the face was the next step. For this we added equal measures of polyurethane and mixed them together, making sure that all was equally mixed, then adding tiny amounts of colour to the mixtures. We chose to make a fleshy colour and add a bit of green to the mixture so that the witch looked evil and old. This process had to be done quite quickly in order for the mixture to work properly,it also should be done from a slight height and at one point only, this is to make sure that there are reduced risks of air bubbles.
We added the colours into the mould and tilted the mould around to make sure that there weren't any air bubbles in the mixture.
After leaving the mixture for about half an hour we returned to check on it. We actually found that there was a crack in the mould and that some of our mixture had leaked out, we fixed this by adding some fresh clay to patch up the leak.
Overall I think that we worked well in a team and that the final outcome was fairly successful. The only thing that I believe we might have worked on a bit more, was designing and developing the character. The actual face and the design worked well, what I mean is that when it came to colouring and making textures for the face, as a group we weren't quite ready or sure as to what we wanted. Another thing that would have been better, had we had time to think and work around was the fact that once we had glued the mask onto Jenny's face we learnt from jenny that the forehead was very heavy and that it slipped down her head, moving down onto her eyes, making it uncomfortable. To counter act this we worked on holding the mask in place, holding different sections to prevent it from sliding. To complete the mask we painted on top of the mask whilst it was secure to Jenny's face to create deeper shadows and age spots.
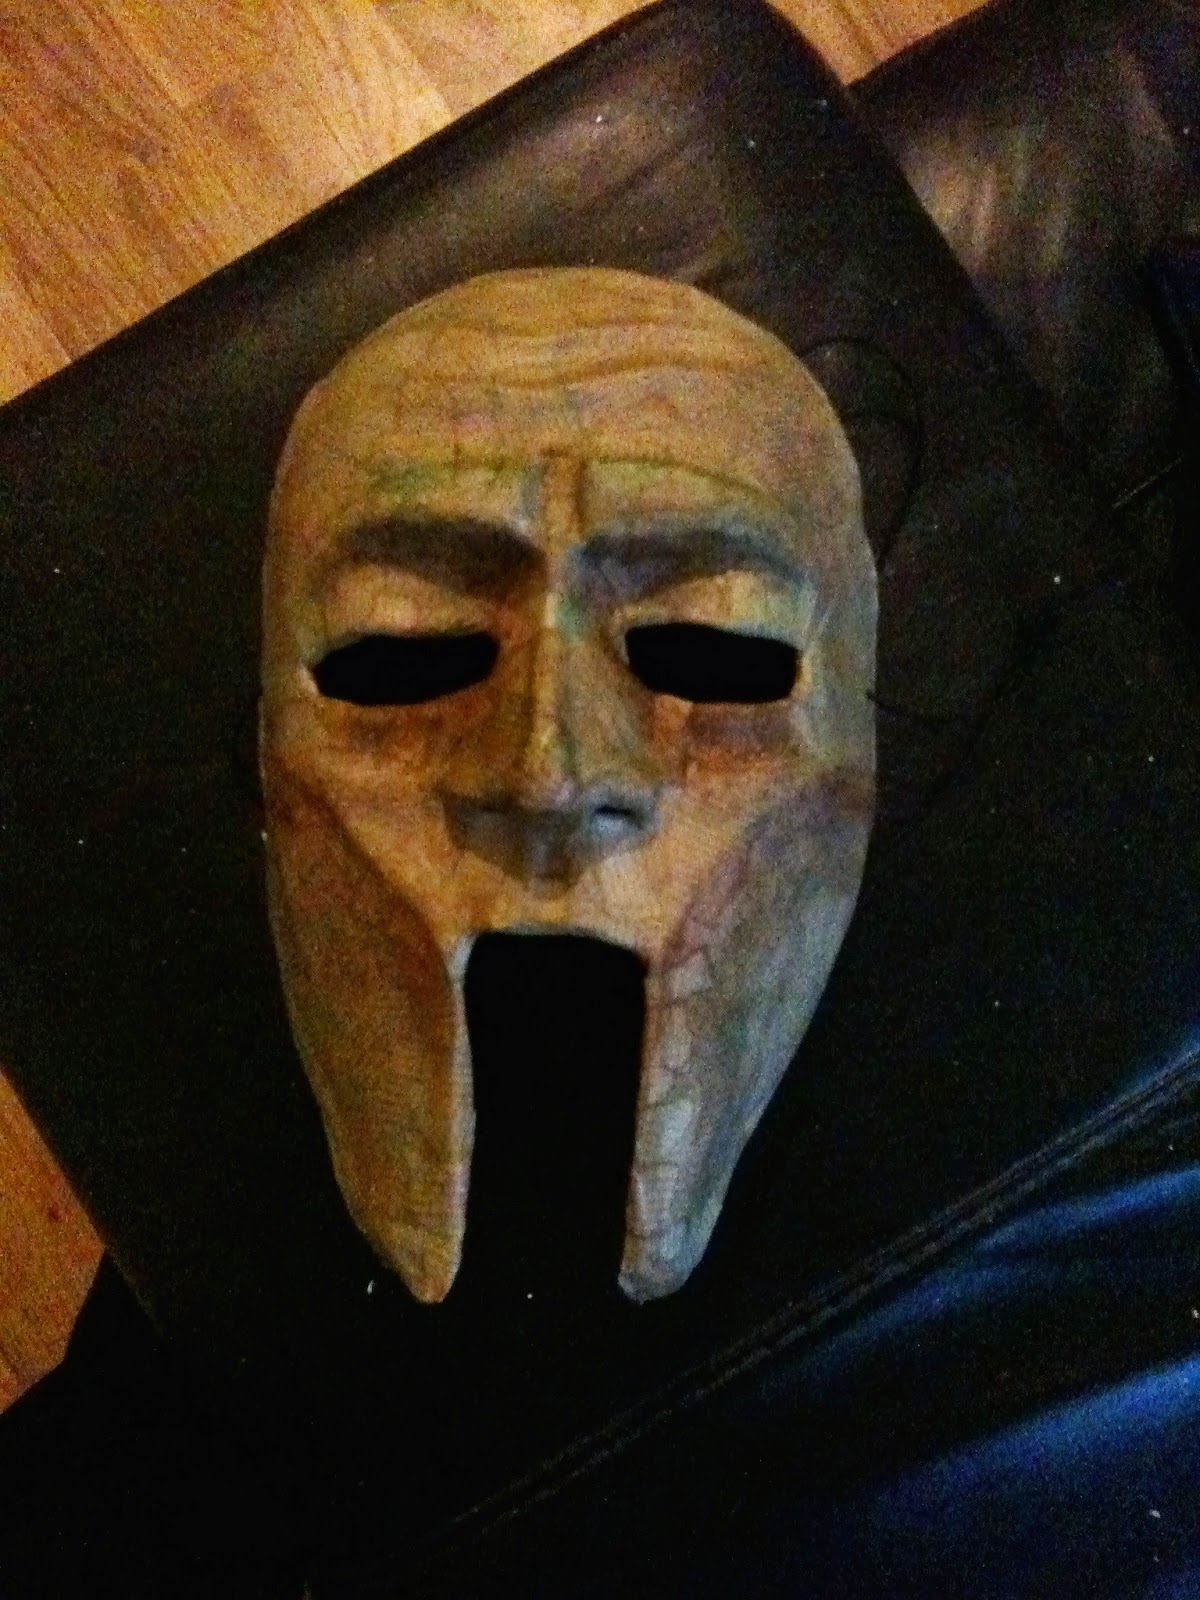
The second type of mask making that we did this week was to make a mask using clay and paper. We started this project of by being given two words. My words were 'Weary' and 'Sentinel'. After this we then we given a basic mould of a face and asked to build on top of it. Using clay we built up a basic shape. I chose to go with a very uniformed and strong shaped face to connect to the sentinel, guard sort of idea. Building onto of the face we worked into the clay and created strong lines and forms across the face. Once the mask was complete, to the way in which we want then we covered the mask in vasiline so that the plaster we put over the mask wouldn't stick or ruin the shape.
Before creating the plaster mould we made a clay barrier so that the plaster wouldn't slip everywhere. Mixing part water and part plaster (enough so that the plaster powder peaks just above to water line). Then mixing them together to create a thicker, dense liquid. We drip the plaster over the mould, making sure we get into the eye sockets, even blowing air into the harder to reach areas and getting out the air bubbles. Once the finer details like the nose, eyes and mouth are all sorted we then drip more of the mixture over the entire face and layer it up to create a solid bowl like structure. Once there are enough layers, using a flat spatula or blunt bread knife create a flat surface, making sure to be careful enough to not catch the clay underneath the wet plaster. The flat surface is for later when the solid plaster will turn upside down, and sit stable on the table. Once the plaster has dried over night we then carefully remove the clay and we are then left with the negative mould of the mask. Clean out the clay that has stayed in the plaster mould with water and then cover the inside with more Vaseline. This is for the paper that we then layer up in the negative mould. Starting with the nose, as this is the hardest place to get to, then working on out to the sides of the face. Making sure everything is covered in brown paper and glue, let this dry. Once the brown paper and glue are dried, tare pieces of blue cloth and repeat the paper mashe technique, creating another layer. When paper mashe-ing, with the brown paper and blue cloth, it is important to cross over the pieces, this makes for a stronger structure. For the final layer, another layer of brown paper finishes the structure. Because the layers will still be wet, especially the nose, we then used a hair drier to allow the paper mashe structures pull away from the plaster.
Fortunately I didn't have any problems with my mask pulling cleanly away from the plaster structure. However some others in the class had a problem with the nose not being fully dry and unfortunately not staying in shape because it hadn't fully dried. To fix this they used more brown paper to strengthen it or in some other cases just placing it back into the mould and leaving it to dry more. The mould helps to keep the shape of the mask and so this is the best thing to do if the mask isn't fully dried. To finish off the mask we measure the best place to punch holes into the side of the masks for the elastic to go through. by doing this we worked together and placing the mask on whilst another person lines up the eye holes with the top of the wearer's ears, then measuring in 1cm from the side to punch the holes.
The past week we have been really focusing down on the Site in the City project.
Talking a walk around the city I came across the Castle in Nottingham. I hadn't visited it before and when I was walking outside along the wall, there was somebody practising singing inside, (maybe for a performance or something). This reminded me about the scene in the story of Cinderella and Ash Puttel. With this I then decided to look at the scene in the story where the protagonist is given something special, ie - Cinderella, where the Fairy Godmother gives Cinders a dress, a coach and coach men. I then began to look at what we, as 20 year olds remember about the story, and the magic scene was what was most mentioned.
I then decided to look at what we actually remember. As well as what kind of objects or imagery we associate with memories or stories.
This then lead me to picking up a pumpkin, ivy vines and choosing to place it outside the castle. However with Halloween just round the corner, I thought this will just remind people Halloween is drawing in. So my next thought was to come up with a way in which to make people think a but harder about what a pumpkin and vines, placed by a castle is actually there for.
To do this I decided to create a 'RESERVED' sign, as in it was reserved for Cinderella by her Fairy Godmother.
I also added a bit of glitter to the piece to make it more interesting, and make people ask a few more questions.
The first place I had originally chosen proved to be ineffective. This was quickly learnt as I realised people didn't walk round the entire way, they seemed to stay one side of the area more. This then meant I moved the piece over to under a tree in a open space.
Here the pumpkin gained a lot of views and some people taking photo's with it?
Not sure why.
Asking people who had spotted it and had gone in to take a closer look, I asked what they thought it was here for, what it might mean and what it reminds them off.
Out of the number of people I asked about 7 of them understood it completely, but were unsure as to whether it was what it was therefore. The uncertainty was gone however when I explained my idea to them. another 3 people didn't connect to it completely but as soon as I confirmed or explained they then understood and retold the story to me to make sure they were right. There was only one person who did not connect to it at all and it turns out they had never seen the Disney film, read the story or a stage production.
Over all I think it worked out fairly well, it has also given me more confidence about my own work and I feel more confident in myself and my work to do it again or try out new ideas.